Friday, May 2, 2025

Viennese Whirls

 Again!  What is it with the late post?  Well, maybe I got a little bit distracted?


We had the best time on the Big Island of Hawai'i but that shouldn't be an excuse.  My goal was to make something every month.  I finished these cookies at 9:45 thelast night of the month, April 30th-so I met my goal-I just didn't get it posted until now, May 2, 2025. So here we go!


Have you ever heard of a Viennese Whirl? It's a butter cookie made into a sandwich.  I was worried it would be a bit like the cookies I made for Valentine's Day but it's not. (I liked those better) These are an
easy cookie to make but not a great choice for someone who is right handed and has some arthritis happening in said right hand.  Squeezing these out of that little bag was hard and they really don't look great.  But, they do taste pretty tasty.
The dough is easy to mix together.  It's just butter and powdered sugar that you beat hard for 5 minutes.  It has some vanilla, all purpose flour, and cornstarch, and maybe a little tiny bit of milk.  That's it-no eggs.
The trick comes in making them look pretty with a star tip and piping bag.  

Draw 2 inch circles on the back of your parchment and then you know where to pipe.  My circles were a bit larger than 2 inches so I piped inside the circle and it seamed to work.  Refrigerate for 10 minutes and then bake at 355*.  Let them cook completely on the cookie sheet and then remove with a spatula.

Frost with the buttercream and add some jam. Top with the other cookie and there you go.  Sprinkle with a bit of powdered sugar is always a great addition.  But not before I took a bite.  They really are quite tasty.


Would I make these again? Probably!  Would I let Mike squeeze them into the circles? YES!  My poor hand was killing me by the time I finished. I hope you will give them a try.  And remember, weighing your ingredients helps to give you consistency.  Get a scale, it really is best to weigh instead of measure.

Viennese Whirls

250 g unsalted butter at room temp (I used salted butter)
3/4 c (105 g) powdered sugar
1 tsp (5 g) vanilla extract
1 1/2 c (225 g) all purpose flour
1/2 c (68 g) cornstarch
**Note here, my dough was so stiff that I added about 1 tbls milk to help and it worked great

Filling

125 g (1/2 c) unsalted butter (or salted)
1 1/2 c (210 g) powdered sugar
1/2 tsp (3 g) vanilla extract
1 Tbls milk - more if needed
raspberry/strawberry jam

Preheat oven to 355*
Line baking sheets with parchment paper that you have drawn two inch circle on the back
In an electric mixer mix the butter until well mixed and then add the powdered sugar and vanilla.  Beat hard for about 5 minutes, scraping the edges a couple times in that 5 minute period, or until it is light in color and light in texture.
Sift the flour and cornstarch into the butter and mix with mixer or by hand.  Add a little milk if it's too stiff-the dough should be soft but not loose
Put the dough into a piping bag that has been fitted with a large star tip.  Squeeze dough into the circles starting at the outside and coming into the middle.  Lift up and move to the next circle.
Put in the refrigerator while you do the next baking sheet.
Bake the first sheet for 10 minutes or until no raw dough is left and edges are just starting to brown.
Let cool on the pan.  
Remove and pair up the cookies with like sizes.  Spread or pipe the buttercream onto one cookie, add jam and top with the other cookie.  Dust with powdered sugar.
*Note, you can store cookies in the refrigerator for up to 5 days if they last that long!

Keep Baking!


Saturday, April 12, 2025

Banoffee Pie - My March bake posted late!

Mary Berry's BANOFFEE PIE

 I totally made this pie in the month of March and I have been dragging my feet to post.  Maybe because I didn't love the way it turned out! Actually, it was really delicious I just cooked the filling too long and it made it a bit difficult to eat.  There were several lessons learned and some day I will make it again and hope for the best.

I had my eye on this pie for a while.  Mary Berry is one of the first to be associated with the Great British Baking Show and is a master baker, so I decided I would use her recipe. Basically, it's a graham cracker crust with a toffee filling, topped with bananas and whipped cream.  The concept is brilliant-my execution, not so much. 

I started with a graham cracker crust in a tart pan so I could remove the outer rim.  


The filling is a mixture of brown sugar, butter and sweetened condensed milk.  What could be better than that? 


Top with a double layer of sliced bananas - I did my bananas last minute but if you have several hours before serving the pie, slice them into lemon juice so they don't turn brown.  Add plenty of sweetened whipped cream and chocolate shavings.  Serve and Enjoy!


Now for the lessons that I learned.
*First, the recipe doesn't call for enough butter in the graham cracker crust.  It fell apart all over the place so next time I try this pie, I will add more butter to hold the crust together.

You can see what a mess the crust was!

*Second, the recipe said to cook the filling, once it comes to a boil, for 5 minutes OR until it is a nice toffee color.  Well, after 5 minutes, my filling was pretty pale and not the color of what I think toffee is, so I continued to cook it. Don't do that! Next time, I will stick to the 5 minutes and we'll see if that works better.
It was tasty-but super chewy and hard to cute.  I just want a creamy, yummy, eat with a fork, kind of pie (Literally, after it sat in the fridge, you had to pick it up and bite it rather than using a fork)

So that's the story of this Banoffee Pie! Will I make it again? Yes, but with the tweaks to the crust and cook time.  If you try it, you'll like it.  Good luck!


BANOFFEE PIE

For the base
175g (6oz) digestive biscuits (graham crackers)
65g (2½oz) butter (add a bit more)

For the toffee filling
115g (4oz) butter
115g (4oz) light muscovado sugar (brown sugar)
2 x 397g cans full-fat condensed milk

For the topping
3 bananas, sliced
a little fresh lemon juice
300ml (½ pint) double cream
a little grated Belgian milk or dark chocolate, for sprinkling

You will need a 23cm (9in) deep loose-bottomed fluted flan tin.

To make the base, put the biscuits (graham crackers) into a polythene bag and crush them to crumbs with a rolling pin. Melt the butter in a small pan, remove from the heat and stir in the crushed biscuits. Mix well.

Spread the mixture over the base and sides of the flan tin. Press the mixture with the back of a metal spoon. Place in the refrigerator

To make the toffee filling, measure the butter and sugar into a large non-stick pan. Heat gently until the butter has melted and the sugar has dissolved. Add the condensed milk and bring to an easy boil, stirring continuously and evenly with a flat-ended wooden spoon for about 5 minutes, or until the mixture is thick and has turned a golden toffee colour – take care, as it burns easily. Turn it into the prepared crumb crust and leave to cool and set. (stick with the 5 minutes)

To make the topping, toss the bananas in lemon juice and arrange the slices over the toffee in a neat layer. Lightly whip the double cream until it forms soft peaks and spread evenly over the bananas. Sprinkle the whole pie with grated chocolate.

Remove the ring and transfer to a flat plate.

Serve well chilled.


Thursday, February 13, 2025

Biscuit Week Meets Valentine's Day

 On the Great British Baking Show, they always have a biscuit week.  The challenges are fun and I thought I should give one of the recipes a try.  A"biscuit" in Great Britain is a hard, thin, and crispy cookie that has a snap and is sometimes filled with something yummy. By definition, it's sweet, crumbly and sometimes buttery.  So this week/month, as my tribute to our friends across the pond, I made Paul Hollywood's Jammy Biscuits.  They are easy to make, BUT they take some time.  Delicious is an understatement. You'll have to give them a try and let me know what you think.


Because everyone, but us American's, use grams instead of cups, I am putting the recipe at the bottom of this post in both grams and measurements for those who don't want to figure out the conversions.  But, remember, it's better to weigh the ingredients than to measure them.  Just sayin!


Cream the butter and sugar together and beat for 3-5 minutes in your stand mixer.  Add the vanilla and eggs and beat until creamy. (*Note, I added half vanilla and half almond extract) Remove from the mixer and stir the flour and cornstarch in by hand.  It will be on the crumbly side but that's okay.  Pour it out onto a floured surface and gently work it with your hands to make a soft dough. Don't overwork it.


Divide the dough in half and then in half again so you have four equal sizes and form them each into a disc.  Wrap east disc in plastic wrap and place in your refrigerator to chill for 20 minutes.

After 20 minutes, remove one disc and roll it out to about the thickness of a nickel - because this was my first time making these, (and I WILL make them again) some may have been a little thicker and some a little thinner.  It's a learning process!


I cut them with a 3 inch fluted cookie cutter.  Paul says to use a 2 3/4 inch but I didn't have one that size.
Place on a cookie sheet that has been lined with parchment paper and put back into the refrigerator for another 20 minutes. You want half of your biscuits to be plain and the other half to have a cutout of your choice in it.  I chose hearts for Valentine's Day!
After 20 minutes in the refrigerator, place them in a 325* oven for 10-12 minutes.  Keep an eye on them so they don't get too brown but you want them to start to barely brown around the edges.  Mine actually baked for 14 minutes but it will be different for each oven, so watch them.

Let them cool on the pan for 5 minutes (I know, you will be setting your timer over and over and over).  Remove to a cooling rack and let cool the rest of the way.
Once they are cooled they are ready to assemble.
Before hand, dust the tops with a generous amount of powdered sugar.  You want them to really look beautiful!

Next, frost the bottoms of the plain biscuit with a little bit of the buttercream and then top that with your favorite jam. You can use raspberry, lemon curd, apricot preserves or strawberry jam.  I used strawberry.


After you spread the jam, carefully top with a powdered sugar biscuit with the cutout.  Look how cute these are.  I took them to the office where I volunteer today and the ladies went a little crazy.  There was not one soul who didn't rave about how yummy they are. 
Happy Valentine's Day and Happy Biscuit Week!  


Paul Hollywood's Jammy Biscuits
(this is a double batch because I needed more than 12 biscuits)

240 grams unsalted butter softened  -  1 cup
240 grams sugar  - 1 cup
2 eggs
1 tsp vanilla
430 grams all purpose flour - 3 1/2 cups
50 grams cornstarch - 1/2 cup

Buttercream

1/2 cup softened butter
1 1/2 cups powdered sugar
1 tsp vanilla

Mix the butter until fluffy, sift in the powdered sugar and add the vanilla.  Mix until thick and fluffy. I did add about 1 tsp of whipping cream to help bring it together.  It will be thick.

Mix the butter and sugar until fluffy - about 3-5 minutes in your stand mixer.  Add the eggs and the vanilla and mix until well blended.  Remove from the stand mixer and stir in the flour and cornstarch (mix these together with a whisk) until almost mixed- it will be crumbly.  Pour out onto a lightly floured surface and gently work with your hands into a soft dough.  Do not overwork.  Divide in half and then divide each half in half again. (*Note, if you are making half this recipe, only divide the dough in half)
Form each piece into a disc and wrap in plastic wrap.  Put in the refrigerator to chill for 20 minutes. 
After chilling your dough, remove one disc and roll out to about the thickness of a nickel.  Cut with a fluted cookie cutter and place each biscuit onto a cookie sheet lined with parchment paper. Rework the dough scraps and cut more until you have 12 bottoms.  Put back into the refrigerator to chill for another 20 minutes.  Remove another disc and repeat the process, except, with these you want to cut a shape into the center of the biscuit.  It can be any shape for any holiday that you want. Put the solid biscuit onto the cookie sheet and then cut the shape out.  Save the dough and use it to make a few extra biscuits. Put them in to chill.
Meanwhile, preheat your oven to 325*

Bake the first sheet of biscuits for 10-12 minutes watch them so they don't get overly baked.  You want the edges to just begin to brown.  Remove from the oven and let cool on the cookie sheet for 5 minutes.  Remove to a cooling rack and cool the rest of the way.

Dust the tops with a generous amount of powdered sugar.  Assemble the biscuits by spreading a dollop of the butter cream on the plain biscuit and then top with your choice of jam.  Add the top biscuit.  What a delightful treat.

Keep on Baking!


Thursday, February 6, 2025

Leslie's Parkerhouse Dinner Rolls (So Yummy)

Years ago, my friend Leslie shared her recipe for the most delicious rolls. These little pillows of deliciousness have been on my dinner table for over 35 years.  Whether it's Thanksgiving, Christmas Eve, Easter, or just a nice Sunday dinner, these rolls will be gobbled up in no time at all.
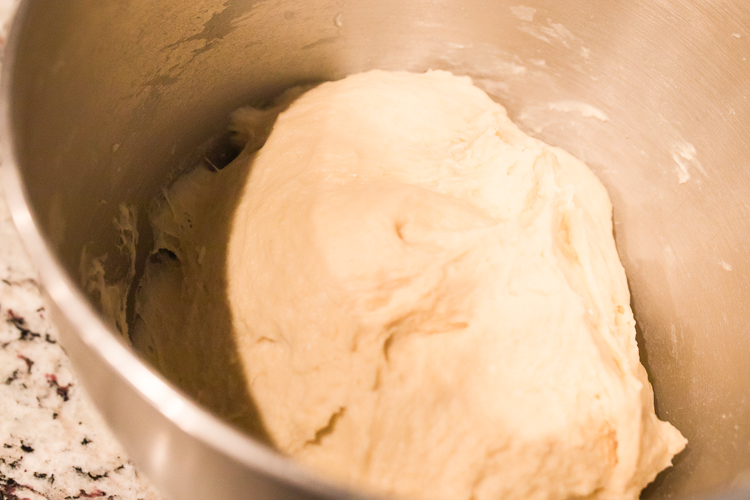
Just mix the dough in your big mixer with a dough hook.  The dough is soft and maybe just a bit sticky, but that is okay.  I just leave the dough in the same bowl that I mixed it in, cover it and let rise until double.


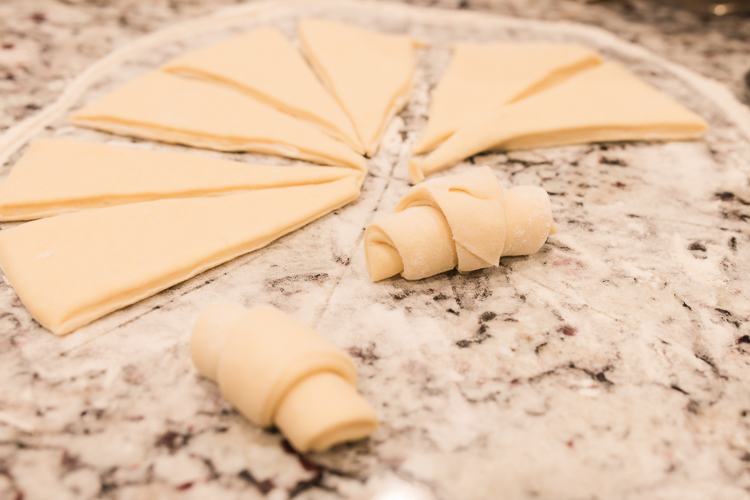
 After the dough has risen to double in size, pour out onto a floured work area and cut into thirds.  Roll each third into a large circle and cut (I use a pizza cutter) into 16 triangles. Starting at the wide end of the triangle, roll into a croissant shape roll.  Place on a large cookie sheet that has been sprayed with non stick spray. Cover with a clean dishtowel and let rise to double.
Bake at *350 for 15-18 minutes until a beautiful golden brown.  Remove from the oven and spread the tops with melted butter.
Get ready to be amazed


These rolls will quickly become your favorite.  You can make them any shape that you want.  You can also make cinnamon rolls out of this dough. Enjoy!

                                                                            Rolls ( Leslie’s Parkerhouse) 


3 cups milk  

1 cube butter 

1/2 cup sugar 

2 tsp salt 

1/2 cup warm water 

2 Tbls yeast 

2 eggs 

9 cups flour 


Mix milk and butter, warm in the microwave to melt the butter but don’t let it get too hot.  Dissolve yeast in warm water, let sit a couple of minutes to proof.  Measure half the flour, sugar, and salt into your mixer bowl. Add the milk mixture and mix with a dough hook.  Add the yeast and mix well.  Beat in the eggs and beat for 2-3 minutes to build the gluten.  Add the rest of the flour and mix until it pulls away from the edge and forms a ball.  Cover. Let raise until double. (I leave mine in the bowl I mixed it in and cover with a clean dishtowel)


Pour out onto a floured board. Cut into thirds and roll out in a large circle (about 12-15 inches around).  Cut into 16 triangles and roll from wide side to the point.  Raise until double in size.  Bake at 350* for 15-18 minutes. (I try not to overtake)  Brush with melted butter.

**makes 4 dozen rolls


Keep on Baking!


Monday, January 27, 2025

National Chocolate Cake Day - Molten Chocolate Lava Cakes for Two

In honor of National Chocolate Cake Day, I thought I would try this recipe for Molten Chocolate Lava Cake for two.  This recipe is perfect for two people but it really could be eaten by four!  It's rich and decadent and a bit of an overdose on chocolate.


The recipe is easy peasy!   So get ready!  Let's go!
Preheat your oven to 450*

Generously butter two ramekins and dust with cocoa powder to help them release and add to the chocolatey goodness.

Melt the butter and add the chocolate chips so they are melted and completely smooth!

Use one egg yolk and one whole egg at room temperature.  Mix with a whisk until frothy! And then whisk in the powdered sugar.

Mix in the cooled chocolate mixture and then add the flour!


Divide the batter into the two ramekins

And bake for 13 and 1/2 minutes.  I might even go 14 minutes BUT you don't want to overbake!!!


Run a knife around the outside and invert onto a plate.  Dust with powdered sugar and add some whipped cream and, Voila, you have a delicious dessert to impress anyone that you serve it to!
Recipe is below!


Molten Chocolate Lava Cake for Two  

     4 Tbls unsalted butter, melted

2 ounces dark chocolate chips

                                                                             1 whole egg

                                                                              1 egg yolk 

                                                                      1/2 cup powdered sugar

                                                              1/4 cup flour with 1 tsp removed

Preheat oven to 450*.  Butter the bottoms and sides of two ramekins.  Dust with cocoa powder.  In a microwave safe bowl, melt the butter and then add the chocolate chips.  Mix until smooth.  Let come to room temperature.

In a bowl, whisk the egg and egg yolk until frothy.  Mix in the powdered sugar until completely mixed.  Add in the melted chocolate mixture and stir until completely incorporated.  Add in the scant 1/4 cup flour and mix.  Divide the batter evenly into the two ramekins.  Place ramekins on a cookie sheet and put into the oven. 

Bake for 13.5 minutes.  My recipe called for 13 minutes and I really think it could have gone just a bit longer.  Remove from the oven and loosed the edges with a knife.  DO NOT WAIT to do this.  Invert onto a plate and remove the ramekin.  Dust with powdered sugar and add some whipped cream.  Enjoy!

**Note: two people really could share one lava cake.  These are very rich. But then again, you may not want to share.  Enjoy!


                                                                        Keep on Baking!


Tuesday, January 21, 2025

Eat the Whole Batch Chocolate Chip Cookies

Have you ever had a hankering for some warm and gooey chocolate chip cookies BUT you knew if you made a big batch you would be in real trouble to have them in such close proximity.
I found this cookie recipe that is only supposed to make 6, yes, you heard that right, 6 cookies.
I tried the recipe and yup- it made 6 delicious chocolate chip cookies. I thought you might like the recipe.

Preheat oven to 350*
First, you start with 3 Tablespoons of soft, salted butter.  
Add 3 Tablespoons brown sugar and 1 1/2 Tablespoon granulated sugar

Mix everything together with a spoon.  No need to make a mess with the stand mixer-or even a hand mixer for that matter.  The spoon works great.

Add 1 egg yolk (save that white for something else) and 1/2 tsp vanilla.  Stir it all up together!
Add in 1/2 cup flour, 1/2 tsp cornstarch, and 1/4 tsp baking soda.  I mixed the dry ingredients in a separate bowl just to make sure the cornstarch and soda were mixed in well.

Add 6 Tablespoons chocolate chips and stir them to incorporate.  You are now ready for the magic.
Roll the dough into 6 balls.  I made 9 because I'm taking 4 to bowling tomorrow.  Did you know that I bowl?  Yes!  I'm on a bowling league with friends that I have known for over 60 years. (Sorry, that really dates me-I'm old!) The problem is that when we get to our third game, we're a little out of steam, so I thought if we had a little sugar, it might ramp us up for that third game.  So, tomorrow, cookies after game two. We'll see if my madness works.

Sorry about the squirrel.  Roll the dough into 6 or 9 balls and put them in the freezer for 5 minutes.  This is important because you don't want them to spread flat all over your cookie sheet.
After 5 minutes, put them on a cookie sheet and place in your oven.  Bake for 9-10 minutes or until they are golden on top but not over baked.  I actually baked these for 11 minutes.

Cool on the cookie sheet for a minute and then move to a rack.  If you like them warm they are perfectly crunchy on the bottom, soft in the middle and so full of melted divine chocolate.

So that's my story about the 6 chocolate chip cookies and how you can eat the whole batch if you want to.
Enjoy


6 Chocolate Chip Cookies

preheat oven to 350*

3 Tbls Salted Butter, softened
3 Tbls brown sugar
1 1/2 Tbls granulated Sugar
1 egg yolk
1/2 tsp vanilla
1/2 cup all purpose flour
1/4 tsp baking soda
1/2 tsp cornstarch
6 Tbls chocolate chips (I used semi-sweet)

Mix the butter and sugars together with a spoon.  Add the egg yolk and vanilla and mix.  Stir in the flour, baking soda, and cornstarch.  Add the chocolate chips and mix well.  (There are a lot of chips)
divide dough and roll into balls (6 large or 9 smaller)
put the dough balls into the freezer for 5 minutes. 
Place on cookie sheet using parchment if you have it.
Bake for 9-10 minutes or until the cookies are golden brown.  Do not over bake.
Cool for a minute on the cookie sheet and then move to a cooling rack.

Eat warm or save.  You have my permission to eat the whole batch.  No judgement here!
*Hint, Mike likes to make ice cream sandwiches with them cookies, just a thought!

Keep on Baking!


Monday, January 13, 2025

A New Beginning


It's been years since I have posted on this blog.  I guess I got busy, or maybe just needed something different in my life.  I'm not really sure, but I'm back.   I love to bake.  And when I bake, I like to eat.  So, I try not to bake too much and I fail miserably.  When Mike and I returned from our mission, I started watching The Great British Bakeoff (thanks to a couple of my friends who love that show).  As I watched, I started to have a desire to try my had at new, and maybe a little complicated, baked goods. And so, here I am, starting again!  This blog will contain some fun recipes I've been eyeing.  Some are easy! Some are hard!  And some, I may have to try more than once.  There are other recipes, besides baked goods, that I will post-favorites of ours that you might like to try.  Stay with me!  Bear with me! And here we go!

Have you ever heard of Clotted Cream?  Who doesn't love that name? Well, it's a little bit of heaven on a scone.  The Brits love it and I think people who have visited Great Britain love it.  I've always wondered what it was so I did some searching on Pinterest and found that clotted cream is not hard to make, it just takes time - a lot of time.  Basically, it's cream that has been cooked all night at a low temperature, then refrigerated for 12 hours, and then separated from the whey that is left behind.  It's supposed to have a butter like consistency.  Mine didn't turn out quite like that and I almost tried it again, but then, I decided it was good enough and went with it.


Start by preheating your oven to 180* and then measure out 2 cups of heavy whipping cream.  Add to a glass pan that is large enough that the cream is 1 1/2 to 2 inches deep. 
The recipe I used said to cover with foil.  When mine didn't work the way I thought it would, I looked at other recipes and they did not cover their cream.  So you can decide what to do. Put the pan in the oven and let it stay for 12 hours.  DO NOT open the door.  Now this is tricky.  Some ovens shut themselves off if left on too long.  You do not want that to happen.  Mine did.  Mike checked it at 4:30 in the am (who is up at that hour???) and the oven was on, when I went out to pull it from the oven-the oven was off.  It was still warm, and I still needed hot pads to remove it but maybe that's why it didn't work right. Your guess is as good as mine.
This is the way it is supposed to look.  Once you remove it from the oven, let it sit to cool to room temperature.  Then put it in the refrigerator for 12 hours.  
At the end of 12 hours you can remove the clotted cream from the whey left at the bottom of the pan.  Simply start lifting it from one corner to expose the liquid below and then tip the pan up and let the whey run into a bowl.  Hold onto that whey because you can use it in other baking.  In fact, I used a bit in the scones. YUM!  And that's story about clotted cream.  It is not sweetened but with strawberry jam, oh my.
Bring on the scones.  When I started thinking about the recipes I wanted to try, I kept coming back to scones.  They look a little like the baking powder biscuits that I make but they are not the same.  Scones in America are much different than scones in Great Britain and I was anxious to try them.  I looked at recipe after recipe but I wanted to follow Paul Hollywood's recipe.  Do you know Paul Hollywood?  Well, he is one of the judges on the show and he is quite the baker himself.  I had a recipe but wanted to watch him in action.  So, I went to YouTube and there he was in good form.  He mixed the dough with his hands and
so that is what I did.  Here are the steps. First, preheat your oven to 425*
First of all, weigh your ingredients instead of measuring them.  The recipe below is measured in grams and milliliters.
Measure out the flour, using strong flour, or bread flour to us Americans.  Add cold butter cut into cubes.
Begin mixing with your fingers.  You want to break up the butter until it looks like breadcrumbs!

Keeping breaking up the butter.  You don't want any big pieces.
Next, add the sugar and the baking powder.  Mix with your hands to incorporate it.
Crack the eggs into the flour and mix with your hands.  It gets really messy but feels so good.
Add the milk and continue to mix with your hands.  It will be sticky and that's how you want it.
Dump it onto a floured board!
You don't want to knead the dough, but you do want to fold it over itself about 6-7 times.
Pat into a circle!
Roll to about 1 or 1 1/2 inches thick.
Cut your scones.  I don't have a round cutter so I used a glass.  The round cutters are better if you have one.
Lay the scones on parchment paper and put in the oven for 15 minutes.  
15 minutes is about perfect.  I pulled mine out about 30 seconds early.
Move them to a rack to cool.  Look at the height of those babies.  

Let the scones cool a bit.  I was in such a hurry that my clotted cream ran down the sides.  Maybe that is because it is on the runny side but it may have done better if the scone was cooled more.  Can you believe how pretty that is?  

And if you could just reach through the screen for a bite-oh my goodness- you would think you were in heaven.  Such a fun and really easy recipe.  Hopefully, when you feel adventurous, you will give it a try.

Until next time, Keep on baking!


Clotted Cream

2 cups heavy cream

Preheat oven to 180 *

Place 2 cups heavy cream into a glass pan. Place in oven and leave for 12 hours.  Remove from the oven and let sit until cooled to room temperature.  Cover with plastic wrap and carefully move to the refrigerator.  Leave for 12 hours.  Separate the clotted cream from the whey in the bottom of the pan.  You can lift one corner back and then tip the pan and let the whey drain into a bowl. Save the whey for use in other recipes (can be used instead of milk) The brownish layer on top is normal and you just mix it into your clotted cream.  It gives great flavor. The clotted cream should be the consistency of butter.

Store the clotted cream in a jar for up to a week. 


Paul Hollywood's Scones

500 grams strong white flour or bread flour
80 grams unsalted butter - cold and cut into small squares
80 grams sugar
5 tsp baking powder
2 eggs
250 ml milk

For the egg wash
1 egg mixed well

Preheat oven to 425*

Put flour in a bowl and add the cold butter cubes.  With clean hands, mix the butter into the flour breaking up the large pieces of butter until the flour and butter resembles bread crumbs.  Add in the sugar and the baking powder and mix with your hand until incorporated.  Add the eggs right into the bowl and mix with your hands and then add the milk mixing until all the flour is mixed in.  Dump out onto a floured board and fold the dough over itself about 6-7 times.  Do not work too much or the scone will be dense.  Clean off your hands as best as you can before you fold the dough.  Pat into a circle. Wash your hands and then roll into a circle about 1- 1 1/2 inches thick. Cut into scones and place on parchment paper.  Bake for 15 minutes.  (should be perfect timing)

Remove from oven and move to a cooling rack.  Cool.  Eat while still warm.  Serve with clotted cream and strawberry jam. Delish